3D Touchに対応させられるという[Pressure.js]を弄ってみた2
ひとまず実行結果
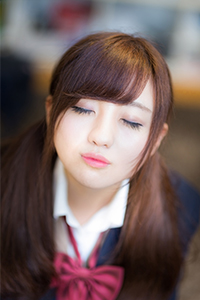
今回は先にサンプルの実行結果を載せておきます。それぞれタッチすることにより、次のような変化が起きます。
モノクロ→本来の色へ, モザイク→取れる, グレーのオーバーレイ→薄れていく


概要
というわけで、今回も[Pressure.js]を使ってサンプルを作ってみました。
3D TouchをなんとWeb上で扱えるようにするJSのライブラリでして、非対応端末では、画面を押している長さで判定しています。
基本的なことについては、こちらをご参照ください。
コードサンプル
まずはPressure.js自体を読み込みましょう。
<script src="js/lib/pressure.min.js"></script>
3枚のパネルのHTML
<div id="test1">
  <img src="/sample/images/js015/img01.jpg" alt="">
</div>
<div id="test2">
  <img src="/sample/images/js015/img02.jpg" alt="">
</div>
<div id="test3">
  <img src="/sample/images/js015/img03.jpg" alt="">
  <div class="overlay"></div>
</div>
3枚目のみグレーのオーバーレイを設けているので、divが1個多いですね。
CSS
#js015 #test1 img, #js015 #test2 img, #js015 #test3 img {
  border-radius: 20px;
  border: 1px solid #ccc;
}
#js015 #test1 img {
  -webkit-filter: grayscale(100%);
          filter: grayscale(100%);
}
#js015 #test2 img {
  -webkit-filter: blur(10px);
          filter: blur(10px);
}
#js015 #test3 {
  position: relative;
  line-height: 0;
}
#js015 #test3 .overlay {
  position: absolute;
  width: 100%;
  height: 100%;
  top: 0;
  left: 0;
  background: #ccc;
  border-radius: 20px;
}
3枚全てに角丸ボーダーを当て、1枚目はモノクロに、2枚目はぼかし、3枚目はオーバーレイを当てています。
JavaScript(モノクロ→本来の色へ)
Pressure.set( '#test1 img', {
  start: function( event ){
  },
  end: function(){
    this.style.filter = 'grayscale(100%)';
    this.style.webkitFilter = 'grayscale(100%)';
  },
  startDeepPress: function( event ){
  },
  endDeepPress: function(){
  },
  change: function( force, event ){
    this.style.filter = 'grayscale('+Pressure.map( force, 0, 1, 100, 0 )+'%)';
    this.style.webkitFilter = 'grayscale('+Pressure.map( force, 0, 1, 100, 0 )+'%)';
  },
  unsupported: function(){
  }
}, {polyfillSpeedUp: 1000, polyfillSpeedDown: 300} );
モノクロ→本来の色へ変化させるためには、タッチされている間にgrayscaleの値が100%→0%に変更されていく必要がありました。
そういった場合は.mapを使用することにより実現可能です。以下の記述部分ですね。
'grayscale('+Pressure.map( force, 0, 1, 100, 0 )+'%)'
例えばタッチされ最終的に10%で止めたいとしましょう。その場合は次のような記述になりますね。
'grayscale('+Pressure.map( force, 0, 1, 100, 10 )+'%)'
JavaScript(モザイク→取れる)
Pressure.set( '#test2 img', {
  start: function( event ){
  },
  end: function(){
    this.style.filter = 'blur(10px)';
    this.style.webktFilter = 'blur(10px)';
  },
  startDeepPress: function( event ){
  },
  endDeepPress: function(){
  },
  change: function( force, event ){
    this.style.filter = 'blur('+Pressure.map( force, 0, 1, 10, 0 )+'px)';
    this.style.webktFilter = 'blur('+Pressure.map( force, 0, 1, 10, 0 )+'px)';
  },
  unsupported: function(){
  }
}, {polyfillSpeedUp: 1000, polyfillSpeedDown: 300} );
続いてモザイク→取れるの処理ですが、こちらも同様に.mapを用いてblurの値を10px→0に変更させています。
JavaScript(グレーのオーバーレイ→薄れていく)
Pressure.set( '#test3 .overlay', {
  start: function( event ){
  },
  end: function(){
    this.style.opacity = 1;
  },
  startDeepPress: function( event ){
  },
  endDeepPress: function(){
  },
  change: function( force, event ){
    this.style.opacity = Pressure.map( force, 0, 1, 1, 0 );
  },
  unsupported: function(){
  }
}, {polyfillSpeedUp: 1000, polyfillSpeedDown: 300} );
最後はグレーのオーバーレイ→薄れていくの処理ですが、今までは対象がそれぞれのimgタグでしたが、この場合はグレーのdivになりますね。
opacityの値を1→0に変更させています。